Heat Pump + Extension UFH Design UK 2026
Heat pump UFH design for UK extension 2026: screed depths, insulation, manifold placement, integration with existing system.
Extension construction is the ideal moment to install UFH for heat pump - cheaper than retrofit, designed in from foundation, delivers best SCOP. This guide covers the design steps, integration with existing heat pump, and cost-benefit analysis.
Why UFH in new extensions is the easy win
Three structural advantages.
- No retrofit complexity. Floor doesn't exist yet - lay UFH pipes + pour screed before finished floor goes down. Vs retrofit which requires lift-the-floor or overlay system (raises floor height, more invasive).
- Lower per-m2 cost. Extension UFH ~GBP 50-80/m2 (just the UFH layer); retrofit UFH ~GBP 100-200/m2 (more complex install). Half the cost when designed in.
- Integrated insulation design. 100mm rigid insulation under screed designed from foundation stage; retrofit insulation tighter constraints. Better U-value + lower heat loss to ground.
For UK households doing extension construction + having heat pump: UFH is the right choice with strong economic justification.
5-step design sequence
What happens when + by whom.
Step 1: Structural floor + insulation (week 1-2 of extension)
- Concrete sub-base or beam-and-block floor structure poured / installed by builder.
- 100mm rigid PIR foam insulation laid over sub-base (typically Kingspan, Celotex, Recticel - GBP 25-40/m2).
- Polythene damp-proof membrane below + above insulation.
- Edge insulation around perimeter (50mm) preventing thermal bridging to walls.
Step 2: UFH pipework (week 2-3)
- UFH installer (specialist trade; sometimes plumber depending on installer network) lays PEX-AL-PEX pipework in pattern.
- Pipe spacing: 150-200mm centres for heat pump installs (lower flow temp = closer spacing needed for adequate heat output).
- Pipe loops: max 100m per loop typically; manifold handles multiple loops for larger areas.
- Pressure test before screed pour - 6 bar for 1 hour confirms no leaks.
Step 3: Screed bed (week 3-4)
- 50-75mm screed bed poured over pipework while pressurised (prevents pipes floating).
- Self-levelling screed (gypsum-based) typical: faster cure (5-7 days walkable, 21-28 days fully cured) vs traditional sand+cement (28-42 days).
- Screed encases pipes; pipes invisible after pour.
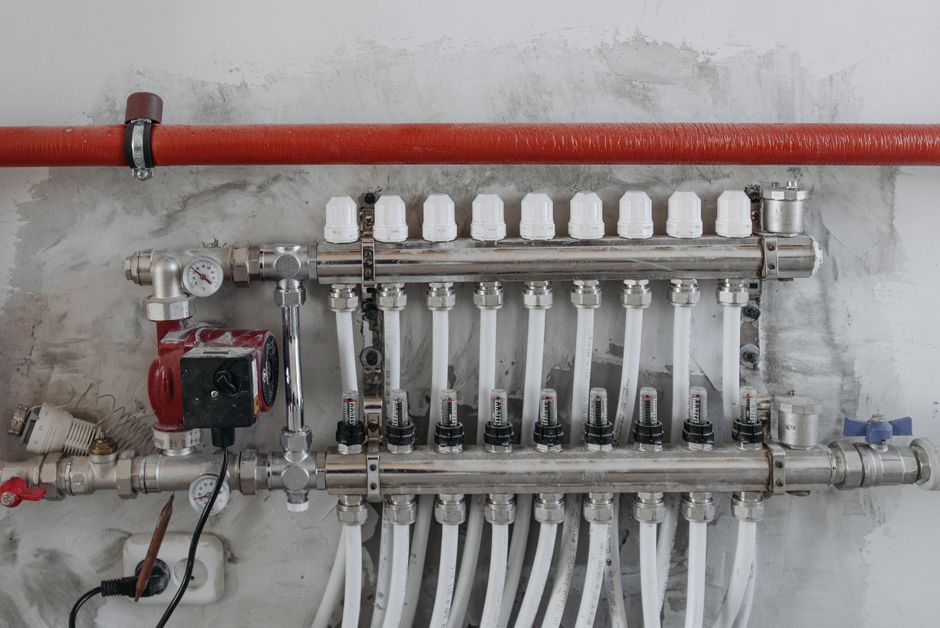
Step 4: Manifold install (week 3-4)
- UFH manifold sited in plant room, utility room, or cupboard within 5-10m of UFH loops.
- Zone valves (1 per loop) + flow meters + thermostatic mixing valve (TMV) for temperature blending.
- Connections to heat pump primary circuit (flow + return).
Step 5: Heat pump integration (week 4-6)
- Hydraulic separator (low-loss header) between heat pump primary + UFH circuit (often skipped for single-circuit installs).
- Zone valves controlled by extension thermostat OR integrated with existing heat pump controller multi-zone setup.
- Commissioning: balance flow rates, test all zones, verify reaching setpoint.
Integration with existing heat pump
How extension UFH connects to whole-house system.
Three integration approaches depending on existing system:
Approach 1: Single-zone integration (simplest)
- Extension UFH connects to heat pump primary circuit alongside existing radiators.
- Single thermostat controls whole house (including extension); UFH treated as one more emitter.
- Limitations: extension UFH runs at same flow temp as radiators (45C typical) - UFH could run at lower flow temp but doesn't.
- Cost: GBP 500-1,000 integration work.
Approach 2: Mixed-mode with TMV (most common)
- Extension UFH connects via thermostatic mixing valve (TMV) that blends heat pump primary flow + UFH return.
- UFH runs at lower flow temp (35-40C) than radiators (45-50C).
- Slight SCOP improvement; better comfort in extension.
- Cost: GBP 800-1,500 integration work.
Approach 3: Multi-zone heat pump (premium)
- Heat pump configured for two distinct zones - radiators (45C flow) + UFH (35C flow).
- Independent thermostats + schedules per zone.
- Best SCOP achievable; future flexibility.
- Cost: GBP 1,500-3,000 integration work + multi-zone controller.
Recommendation: Approach 2 (mixed-mode with TMV) is the right answer for most UK extensions. Cost-effective + delivers SCOP benefit + handles different emitter types correctly.
Cost framework - extension UFH
Typical 25m2 UK extension.
Typical 25m2 UK extension UFH cost breakdown:
- Insulation (100mm rigid PIR): GBP 625-1,000.
- UFH pipework (PEX-AL-PEX + accessories): GBP 500-800.
- Screed bed (50-75mm self-levelling): GBP 750-1,250.
- Manifold + zone valves + TMV: GBP 800-1,500.
- UFH install labour: GBP 500-1,000.
- Heat pump integration + commissioning: GBP 500-1,500.
- Finished flooring (tile / engineered wood / vinyl): GBP 1,500-3,000.
- Total: GBP 5,175-10,050.
vs equivalent radiator extension:
- Two radiators + pipework + install: GBP 1,200-2,000.
- Finished flooring: GBP 1,500-3,000.
- Total: GBP 2,700-5,000.
Marginal UFH cost: GBP 2,475-5,050.
UFH benefit:
- SCOP improvement 0.3-0.6 points across extension = GBP 30-100/year saving on extension heating.
- Better comfort + no radiator visual / placement constraints.
- Higher resale value (UFH considered premium feature).
Pays back via comfort + property value + modest annual saving over extension lifetime (typical 30-50 years).
Compatible floor finishes
What works + what doesn't with UFH.
- Ceramic + porcelain tile: excellent - high thermal conductivity, no expansion issues. Most common finish.
- Stone tile (natural): excellent - similar to ceramic.
- Engineered wood: good if rated for UFH (check manufacturer); some products restrict UFH compatibility.
- Vinyl + LVT (luxury vinyl tile): good - low thermal mass; warms quickly.
- Solid wood: risky - can warp, gap, or crack with UFH temperature cycling. Most manufacturers discourage.
- Carpet: reduces UFH effective output significantly (carpet acts as insulator). Tog rating must be under 1.5 for UFH compatibility.
- Laminate: some products rated for UFH (check spec); thin laminates better than thick.
Recommended for UFH: tile (ceramic, porcelain, stone) or vinyl/LVT for typical UK extension uses (kitchen, dining, family room). Carpet only in bedrooms if low-tog rating + accept performance penalty.
Common mistakes to avoid
Five errors that ruin extension UFH.
- Wrong pipe spacing. Generic 250mm spacing for high-temp boiler systems = insufficient output at heat pump's 35-40C flow temp. Specify 150-200mm at design stage.
- Inadequate insulation under UFH. Under-spec insulation (50mm vs 100mm) = significant heat loss downward to ground = poor SCOP. Use 100mm minimum.
- Screed thickness wrong. Too thin (<40mm) = pipes visible / temperature unevenness. Too thick (>80mm) = slow heat-up response + thermal mass excessive.
- Skipping pressure test before screed. Once screed is poured, leaks require destructive repair. Always pressure test pipework for 1 hour at 6 bar before screed pour.
- Connecting UFH to existing high-temp radiator circuit without TMV. UFH runs at 35-40C flow; radiators at 45-55C. Without TMV, UFH gets the higher flow temp = potentially uncomfortable warm floor + condensation in cooling mode.